How to change the database password for WordPress sites via your xneelo Control Panel
If you are still using konsoleH, refer to this article.
WordPress makes use of a database for much of its functionality. For shared servers (Web Hosting and Volume Plan), this database lives on a specialised database server, separate from the web server that hosts your WordPress website. For Managed Servers, the database is on the same web server as the content.
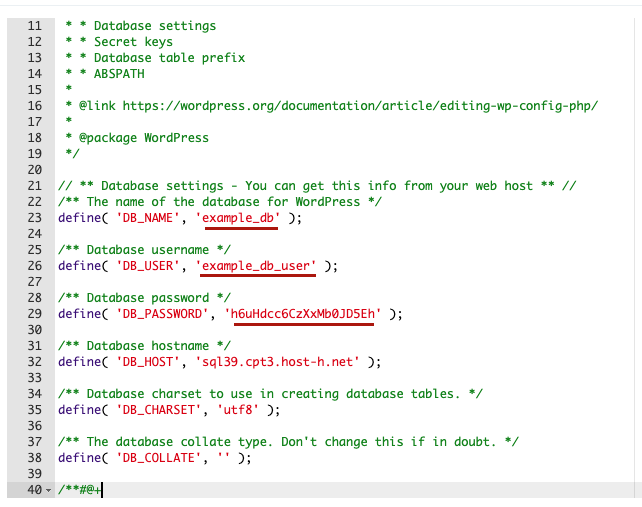
If the database password is reset for security reasons, then the wp-config.php file included with your web files also needs to be updated accordingly, or else the website will break.
Step 1: Change your database passwords
In this step, you will change your database password on the database server.
Note: Subdomains and Multiple Domains make use of databases from the primary/ parent hosting package, so you need to log in to the main account domain.
-
1
-
2Select a Product (i.e. Web Hosting) from the side menu.
-
3Select the domain name.
-
4Under Hosting tools, select Manage MySQL.
-
5Select the 3 dots menu alongside the applicable database.
-
6Click Reset password.
-
7Enter a new password or select Generate password.
Note: Record your new password(s) in your own secure location before clicking Reset.
-
8Click Reset.
Step 2: Edit connection strings via File Manager
In this step, you will update the password on your account on the webserver.
-
1
-
2Select a Product (i.e. Web Hosting) from the side menu.
-
3Select the domain name
-
4Under Hosting tools, select File Manager.
-
5Select the 3 dots menu alongside the wp-config.php file.
-
6Select File editor.
-
7Search for the information you wish to change, click in the text and replace, where:
- DB_NAME is the database name
- DB_USER is the database login
- DB_PASSWORD is the database password
- DB_HOST is the database server name (note that for shared servers, the database does not live on the same server as the website)

-
8Click Save.


