How to transfer a WordPress site to xneelo via the xneelo Control Panel

The information in this article is related to the new xneelo Control Panel.
If you are still using konsoleH, refer to this article.

Transferring your WordPress site from your existing hosting provider over to xneelo need not be a difficult or complex task. Below is a step-by-step guide to help you.

Alternatively, there are a number of migration plugins that may be able to do the job for you – see WordPress.org. Use our WP AppInstaller to create a new WordPress site first, then use the migration plugin to migrate the site content.


  • Step 1: Download Existing Site

    First, you need to download your existing site from your current hosting provider to your computer in order to upload it again to xneelo.

    There are 2 components of a WordPress site that need to be downloaded:

    • Files: This includes the core WordPress files, any installed themes, and plugins. Also, any other documents you may have uploaded to the site, including images, PDF files, etc.
    • Database: The database contains all your posts, pages and other settings for WordPress

    You’ll need to download both the files and the database in order to have a complete copy of your WordPress site.

    Downloading the Files

    Using an FTP program (such as FileZilla), connect to your site and browse to the root of your website. In your FTP program you should see files and folders similar to the following:

    Filezilla wordpress

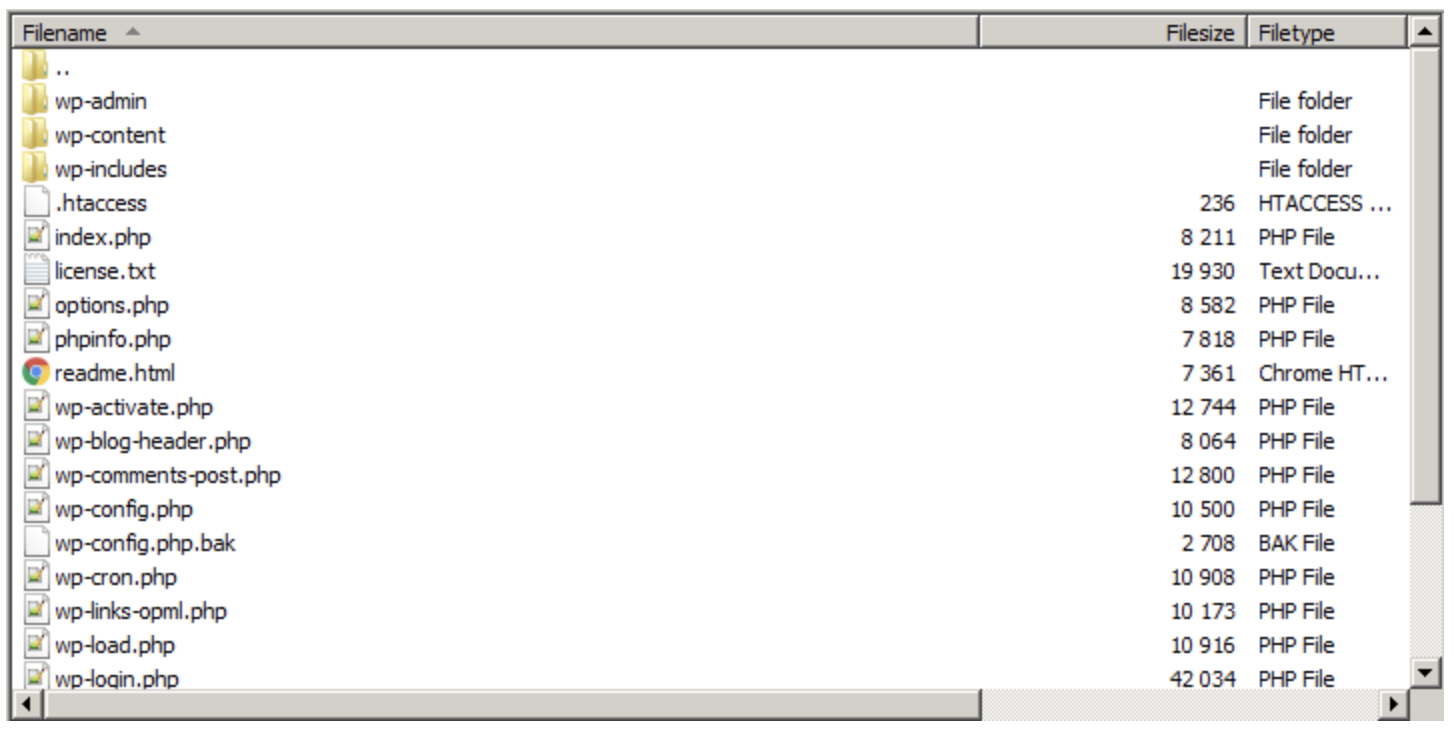
    Select all the files and folders (excluding any non-WordPress files and folders) and download them to a folder on your computer. You can do this either by dragging-and-dropping the files, or selecting the download button in your FTP client.

    Note: Depending on the size of your WordPress site, this process could take a while (up to a few hours). If the process fails, it’s best to start again with all the files.

    Downloading the Database

    Your existing hosting provider should provide you access to your WordPress database via a tool called phpMyAdmin. This can be accessed via the control panel (such as cPanel).

    Once logged in (you may need to provide a username and password) follow these steps to download the database:

    1. Select the database used by your WordPress site, by clicking on the link in the left-hand panel.
    2. Select the Export tab on the right-hand side.
    3. Leave the Export Method option set to Quick.
    4. Set the Format to SQL.
    5. Select Go.

    This will download a file to your computer. If it’s not already, move it to the folder you set up on your computer earlier.


  • Step 2: Set up New Database

    Your new WordPress site will need a database on the new site. Follow these instructions on how to set up your database via the xneelo Control Panel.

    Once you have set up the new database, record the login credentials, database name, and host, as you will need these details later.


  • Step 3: Edit Local Config File

    Before you upload your website files to the new site, you must edit the WordPress config file (wp-config.php) you downloaded earlier.

    Browse to your download folder and locate the file, wp-config.php. Open this file using a text editor (such as Notepad on Windows or TextEdit on Mac). Because this is a copy of the file that is currently uploaded to your live site, it’s not necessary to make a backup before you edit this file.

    You need to find the database details in the config file and replace them with details of your new database.

    Replace the text in bold below with the corresponding values from your new database.

    define(‘DB_NAME’, ‘dbname‘);

    define(‘DB_USER’, ‘dbuser‘);

    define(‘DB_PASSWORD’, ‘dbpassword‘);

    define(‘DB_HOST’, ‘dbhost‘);

    We’ve created the following table to help you find the relevant info required in the wp-config.php file in the xneelo Control Panel.

    wp-config.php konsoleH
    DB_NAME Database
    DB_USER Username
    DB_PASSWORD Password
    DB_HOST Server


  • Step 4: Upload Existing Site

    Uploading the Files

    At this point you can start uploading your files to the new website, by following these steps:

    1. Using your FTP program, connect this time to your domain hosted with us by using either your domain’s xneelo-hosted server name or IP address.
    2. Browse to the public_html folder.
    3. Upload all the files from your local folder to the public_html folder

    This process can take a long time to complete – up to a few hours depending on the size of your website. If it fails, it’s best to upload all the files from scratch again. If you are not able to upload your files after a number of attempts you can contact us for assistance. Please provide our consultants with details of the error that you are currently experiencing to enable us to assist you.

    Uploading the Database

    You can upload your database using phpMyAdmin from within the xneelo Control Panel. Step-by-step visual instructions are available here.

    1. Log in to the xneelo Control Panel.
    2. Select a Product from the side bar.
    3. Select the domain name.
    4. Under Hosting tools, select Manage MySQL.
    5. Click on the 3 dots menu to the right of the relevant database.
    6. Select phpMyAdmin, phpMyAdmin for the database you have selected will open in a new tab.
    7. Select the database name in the left pane to expand the tables, then select Import.
    8. Select Browse under the File to Import section.
    9. Select the dump file you wish to import and click Open.
    10. Select the required Format. In most cases, SQL will be sufficient.
    11. Select Go.


  • Step 5: Find and Replace

    If you are migrating your site over to a new domain name as well, then you will need to replace all references to the old domain with the new domain. The following section explains how to do this.

    Note: Running a global search and replace on your website has its risks. Please only proceed if you are confident in your technical ability. You may wish to consider a WordPress plugin to perform this function for you.

    You will need to download a script that will search your entire website database and replace your old domain with the new one. You can download the script, here. Follow the instructions on this website to install the script on your website.

    Once the script is installed, browse to the script folder using your web browser. You should see a page similar to this:

    search/replace

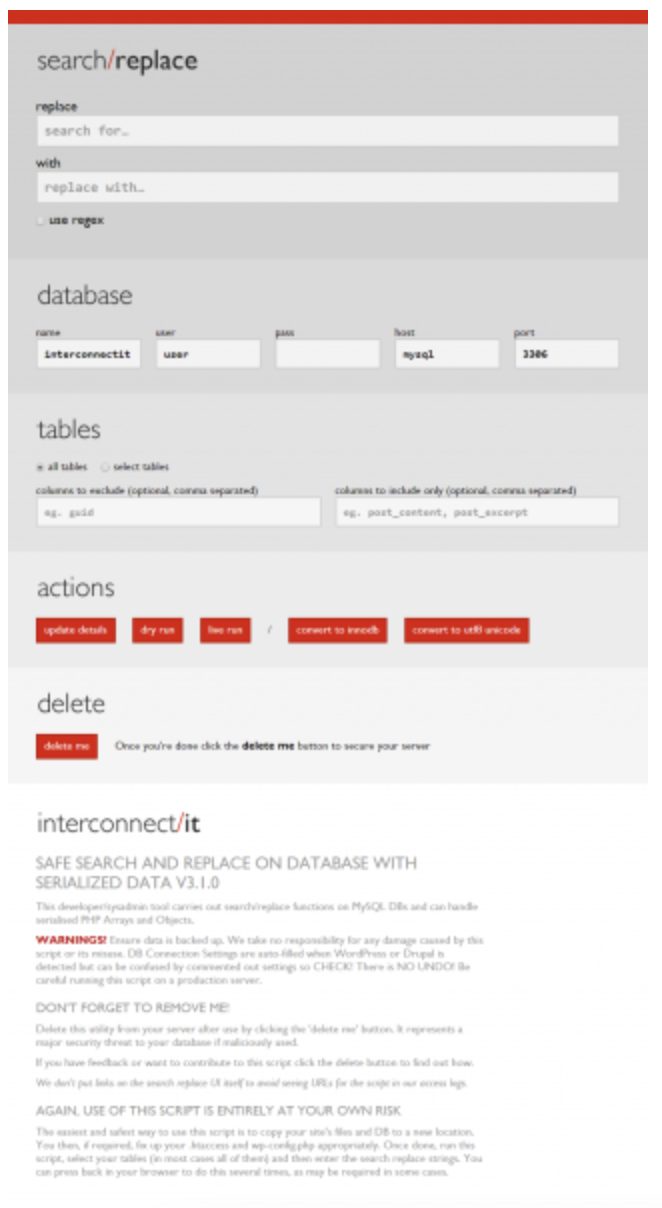
    Fill out the fields as follows:

    1. Replace: Enter your new domain name here, for example: newdomain.co.za
    2. Search: Enter your old domain name here; olddomain.co.za
    3. Database: Enter your new database details here
    4. Select Update Details.
    5. Select Live Run to start the search and replace process.

    Once complete, all references to your old domain name should have been replaced with your new domain name.


  • Step 6: Testing your New Site

    If you are only migrating the site over to us, while keeping the same domain name, we suggest that you test your new site before transferring your domain.

    The easiest way to do this is by emulating the DNS change by updating the host file on your computer

    1.  Find the IP address of the server your website is hosted on.
    2.  Update your host file. Your host file could be in various locations based on your operating system:

      In Windows, the file is located in the following folder:

      C:WINDOWSsystem32driversetchosts

      On Mac, the file is located here:

      /etc/hosts
    3. Edit this file using a text editor (with Administrative privileges). Once opened, add the following to the bottom of the file: The IP address of your server, followed by a tab and then the domain name of your website e.g:

      41.204.202.32        www.example.com

    4. Save the file and browse to your domain name; you should see your WordPress site as hosted on xneelo.