


How to transfer a WordPress site to xneelo via konsoleH
If you are using our new Control Panel, refer to this article.
Make the switch and discover a simpler, more secure way to manage your hosting.
Transferring your WordPress site from your existing hosting provider over to xneelo need not be a difficult or complex task. Below is a step-by-step guide to help you.
Alternatively, there are a number of migration plugins that may be able to do the job for you – see WordPress.org. The Duplicator plugin is frequently used for website migration purposes.
Use our WP AppInstaller to create a new WordPress site first, then use the migration plugin to migrate the site content.
Download Existing Site
First, you’ll need to download your current site from your current hosting provider to your computer.
There are 2 components of a WordPress site that need to be downloaded:
- Files: This includes the core WordPress files, any installed themes, and plugins. Also, any other documents you may have uploaded to the site, including images, PDF files, etc.
- Database: The database contains all your posts, pages and other settings for WordPress
You’ll need to download both the files and the database in order to have a complete copy of your WordPress site.
Downloading the Files
Using an FTP program (such as FileZilla), connect to your site and browse to the root of your website. In your FTP program you should see files and folders similar to the following:
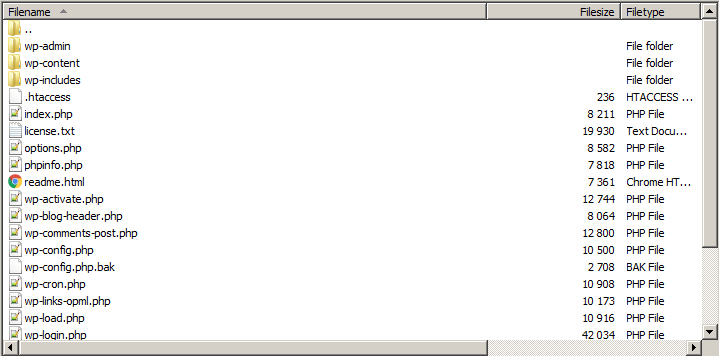
Select all the files and folders (excluding any non-WordPress files and folders) and download them to a folder on your computer. You can do this either by dragging-and-dropping the files, or selecting the download button in your FTP client.
Note: Depending on the size of your WordPress site, this process could take a while (up to a few hours). If the process fails, it’s best to start again with all the files.
Downloading the Database
You should have access to your database through your current provider. If unsure, contact them for help downloading it.
If you make use of phpMyAdmin on your control panel or cPanel, follow the below steps:
- Choose your WordPress site’s database from the left panel.
- Click the Export tab on the right.
- Keep Export Method as Quick, and Format as SQL.
- Click Go to download the file. Move it to your designated folder on your computer.
Set up New Database
Your new WordPress site will need a database on the new site. Follow these instructions on how to set up your database via konsoleH.
After configuring the new database, note down the login credentials such as database name, database username, password, and hostname. You’ll need these later when updating the connection strings for the database.
Edit Local Config File
Before uploading your website files to the new site, edit the WordPress configuration file (wp-config.php) that you previously downloaded.
Follow these steps:
- Navigate to your download folder and locate the wp-config.php file. Open it using a text editor like Notepad (Windows) or TextEdit (Mac). Since this is a copy of your live site’s config file, there’s no need to create a backup before editing it.
- Look for the database details section in the config file and replace the italicized text with the corresponding values from your new database.
Here’s a table to help you match the information in wp-config.php with the details in konsoleH:
| wp-config.php | konsoleH |
| DB_NAME | Database |
| DB_USER | Username |
| DB_PASSWORD | Password |
| DB_HOST | Server |
Replace ‘dbname’, ‘dbuser’, ‘dbpassword’, and ‘dbhost’ with the actual database name, username, password, and server details for your new database as provided by konsoleH. Once you’ve made these changes, save the wp-config.php file.
Upload Existing Site
Uploading the Files
The next steps are to upload your files to the new website using FTP:
- Use your FTP program to connect to your domain hosted with us. You can connect using either your domain’s xneelo-hosted server name or IP address.
- Navigate to the public_html folder in your FTP program.
- Upload all the files from your local folder to the public_html folder on the server.
Note that the uploading process may take a long time to complete, especially for larger websites. If the upload fails, starting the process from scratch is recommended. If you encounter persistent issues with uploading your files, reach out to our Support Team for assistance. Provide them with details of the error you’re experiencing to help them assist you effectively.
Uploading the Database
You can upload your database using phpMyAdmin from within konsoleH. Step-by-step visual instructions are available here.
- Log in into konsoleH
- Select the website name under the Hosting Services tab
- Select Manage Services in the left-hand menu
- Under Databases, select Manage MySQL
- Select the database you created earlier, by clicking on the checkbox
- Select phpMyAdmin in the top right. PhpMyAdmin will now open in a new window.
Now, you can upload the database using phpMyAdmin.
Follow these steps:
- Open phpMyAdmin in a new window.
- Click on the Import tab.
- Under File to Import, select the button next to Browse your computer.
- Navigate to the location of the downloaded database file and select it.
- Click Open.
- Ensure that the drop-down box under the Format heading is set to SQL.
- Click Go to initiate the upload process.
If the upload proceeds smoothly, your database will be uploaded. In case of any issues, contact our Support team for assistance.
Find and Replace
If you’re moving your website to a new domain, you’ll need to update all mentions of the old domain with the new one. Here’s how to do it:
Note: Making global search and replace changes carries risks. Only proceed if you’re confident in your technical skills.
Consider using a WordPress plugin for this task.
Download a script that scans your website’s database and swaps the old domain with the new. Get the script here and follow the installation instructions on the website.
After installing the script, access the script folder through your web browser. You should see a page that looks like this:
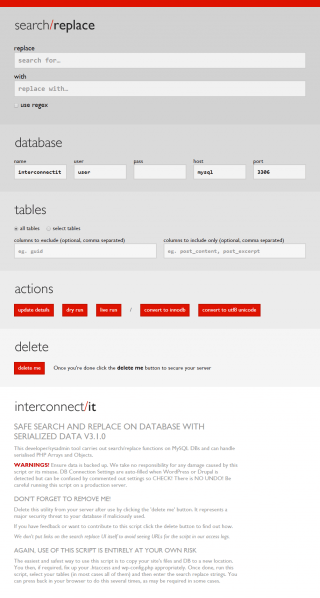
Fill out the fields as follows:
- Replace: Enter your new domain name here, for example: newdomain.co.za
- Search: Enter your old domain name here; olddomain.co.za
- Database: Enter your new database details here
- Test the database connection
- Select “all tables” unless you would like to exclude tables then you can use the “select tables” option.
- Run a dry run test by selecting the option “Do a safe test run”.
- You may then proceed to run a live run by selecting “Search and Replace” (Please note this cannot be undone).
- Select “Live Run” to start the search and replace process.
After finishing the process, all mentions of your old domain should have been substituted with your new domain and you may proceed to delete the Search and Replace directory.
Testing Your New Site
If you are only migrating the site over to us, while keeping the same domain name, we suggest that you test your new site before transferring your domain.
The easiest way to do this is by emulating the DNS change by updating the host file on your computer
- Find the IP address of the server your website is hosted on.
- Update your hosts file. Your hosts file could be in various locations based on your operating system:
In Windows, the file is located in the following folder:C:\Windows\System32\drivers\etcOn Mac, the file is located here:
/etc/hosts
- Edit this file using a text editor (with Administrative privileges). Once opened, add the following to the bottom of the file: The IP address of your server, followed by a tab and then the domain name of your website e.g:
41.204.202.32 www.example.com - Save the file and browse to your domain name; you should see your WordPress site as hosted on xneelo.
Transfer Domain
The final step in this process is to transfer your domain name to us. This will ensure that when your visitors browse to your domain name they will see your website as hosted with xneelo. Have a look at one of our comprehensive guides on transferring your domain to us.

The new xneelo Control Panel is here
Experience a simpler, more secure way to manage your hosting. Most features are now live and ready for you. Switch now

